As per previous years the team in Holland have produced a comprehensive tuning guide for the Machine M5.
This guide is full of easy accessible information to get the very best performance out of your Machine in very few steps. Get the tuning right from the very first time on the water!
M5 Machine tuning guide, Avanti Team Netherlands
The intention of this guide is to provide you with trouble-free tuning instructions for the M5, ensuring solid performance already the first time you are on the water.
We start with the BASIC TRIM settings, which include downhaul, cam pressure, outhaul and batten tension.
For TOP PERFORMANCE more details will be provided further down in this brief.
Please start with the marked length on the sail for the extension, mast length and to the boom add 20- 30 mm to the given length.
Make sure during first time rigging to guide the head cap with your fingers into the mast top.
This guide is divided into:
1. Down haul trim
2. Camber pressure, rotation and spacers
3. Out haul trim / grommet selection
4. Batten and tack strap tension
5. Mast choice
6. Board – Sail variables to get your gear flying easier
- Down haul trim
Down haul(DH) tension is by far the most influential variable on sail performance.
During rigging numerous ways of looking to your sail are available to show a relation with DH tension. Preferable one or more easy to interpret DH indicators, leading to a simple but reliable way of sail tuning.
We found two strongly related indicators.
One related to the position of the small batten above batten 5 relative to
the ground, and the other to the fold depth in panel 3.
A list of Loose Leach depth per given sail size is supplied below, measured to the sleeve – foil interface. These values are intended for sailing in overpowered conditions, add 2 cm for normal conditions
(Rival masts used). Put a small (reflective) sticker on that position.
See below picture how to measure the foil depth in panel 3.
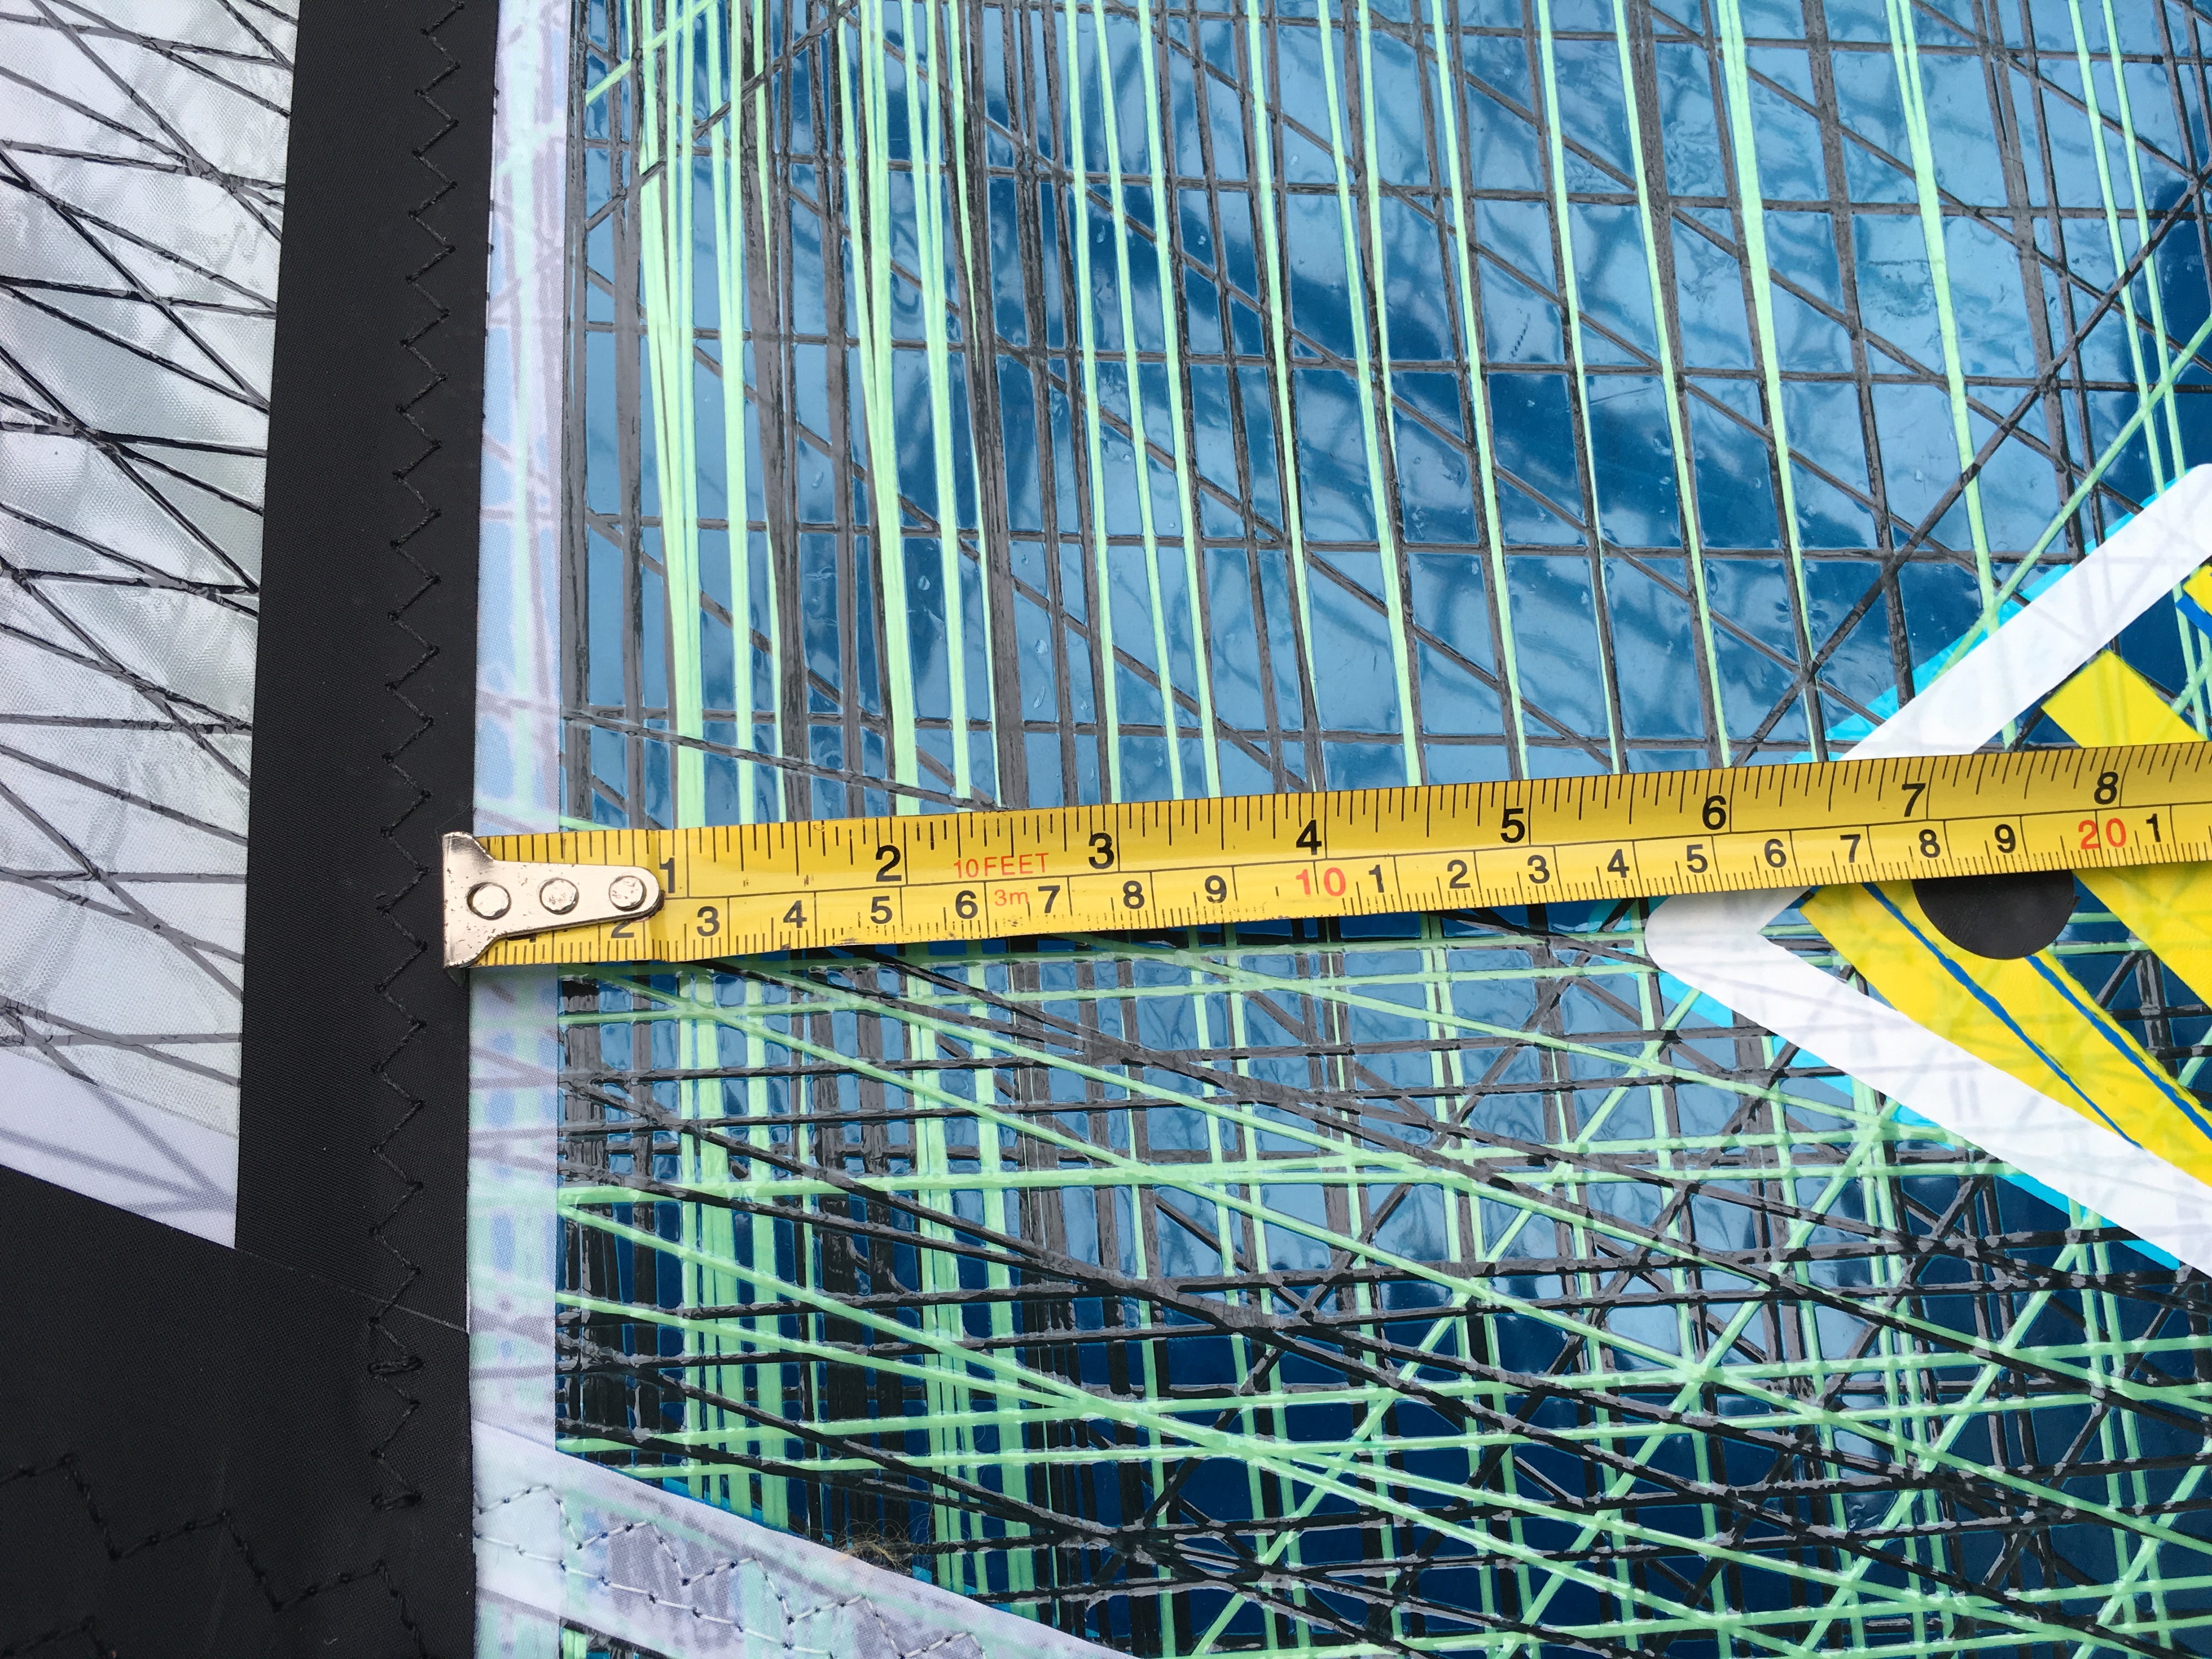
Trim indicator distance per given sail size.
Measurement is relative to the sleeve – foil interface
Recognition of the trim indicator during downhauling is easiest when the top of the sail is put in the direction of the sun, while moving the boom end a little up and down. Still difficult to see ? Hold the mast top in your left hand while moving panel 1 a little up and down.
For sure you will be able to see the marker position relative to the fold depth. Also starting with too much DH and releasing till the required fold depth is reached will help.
M5 5,6 – TBC
M5 6,3 – 21 cm
M5 7 – 22 cm
M5 7,7 – 23 cm
M5 8,4 – 24 cm
M5 9,2 – 25 cm
As alternative you could look to the position of the small batten above batten 5 relative to the ground (batten 8 is lowest batten). Apply DH till the small batten above batten 5 hits firmly the ground. This method will only work on a flat
underground.
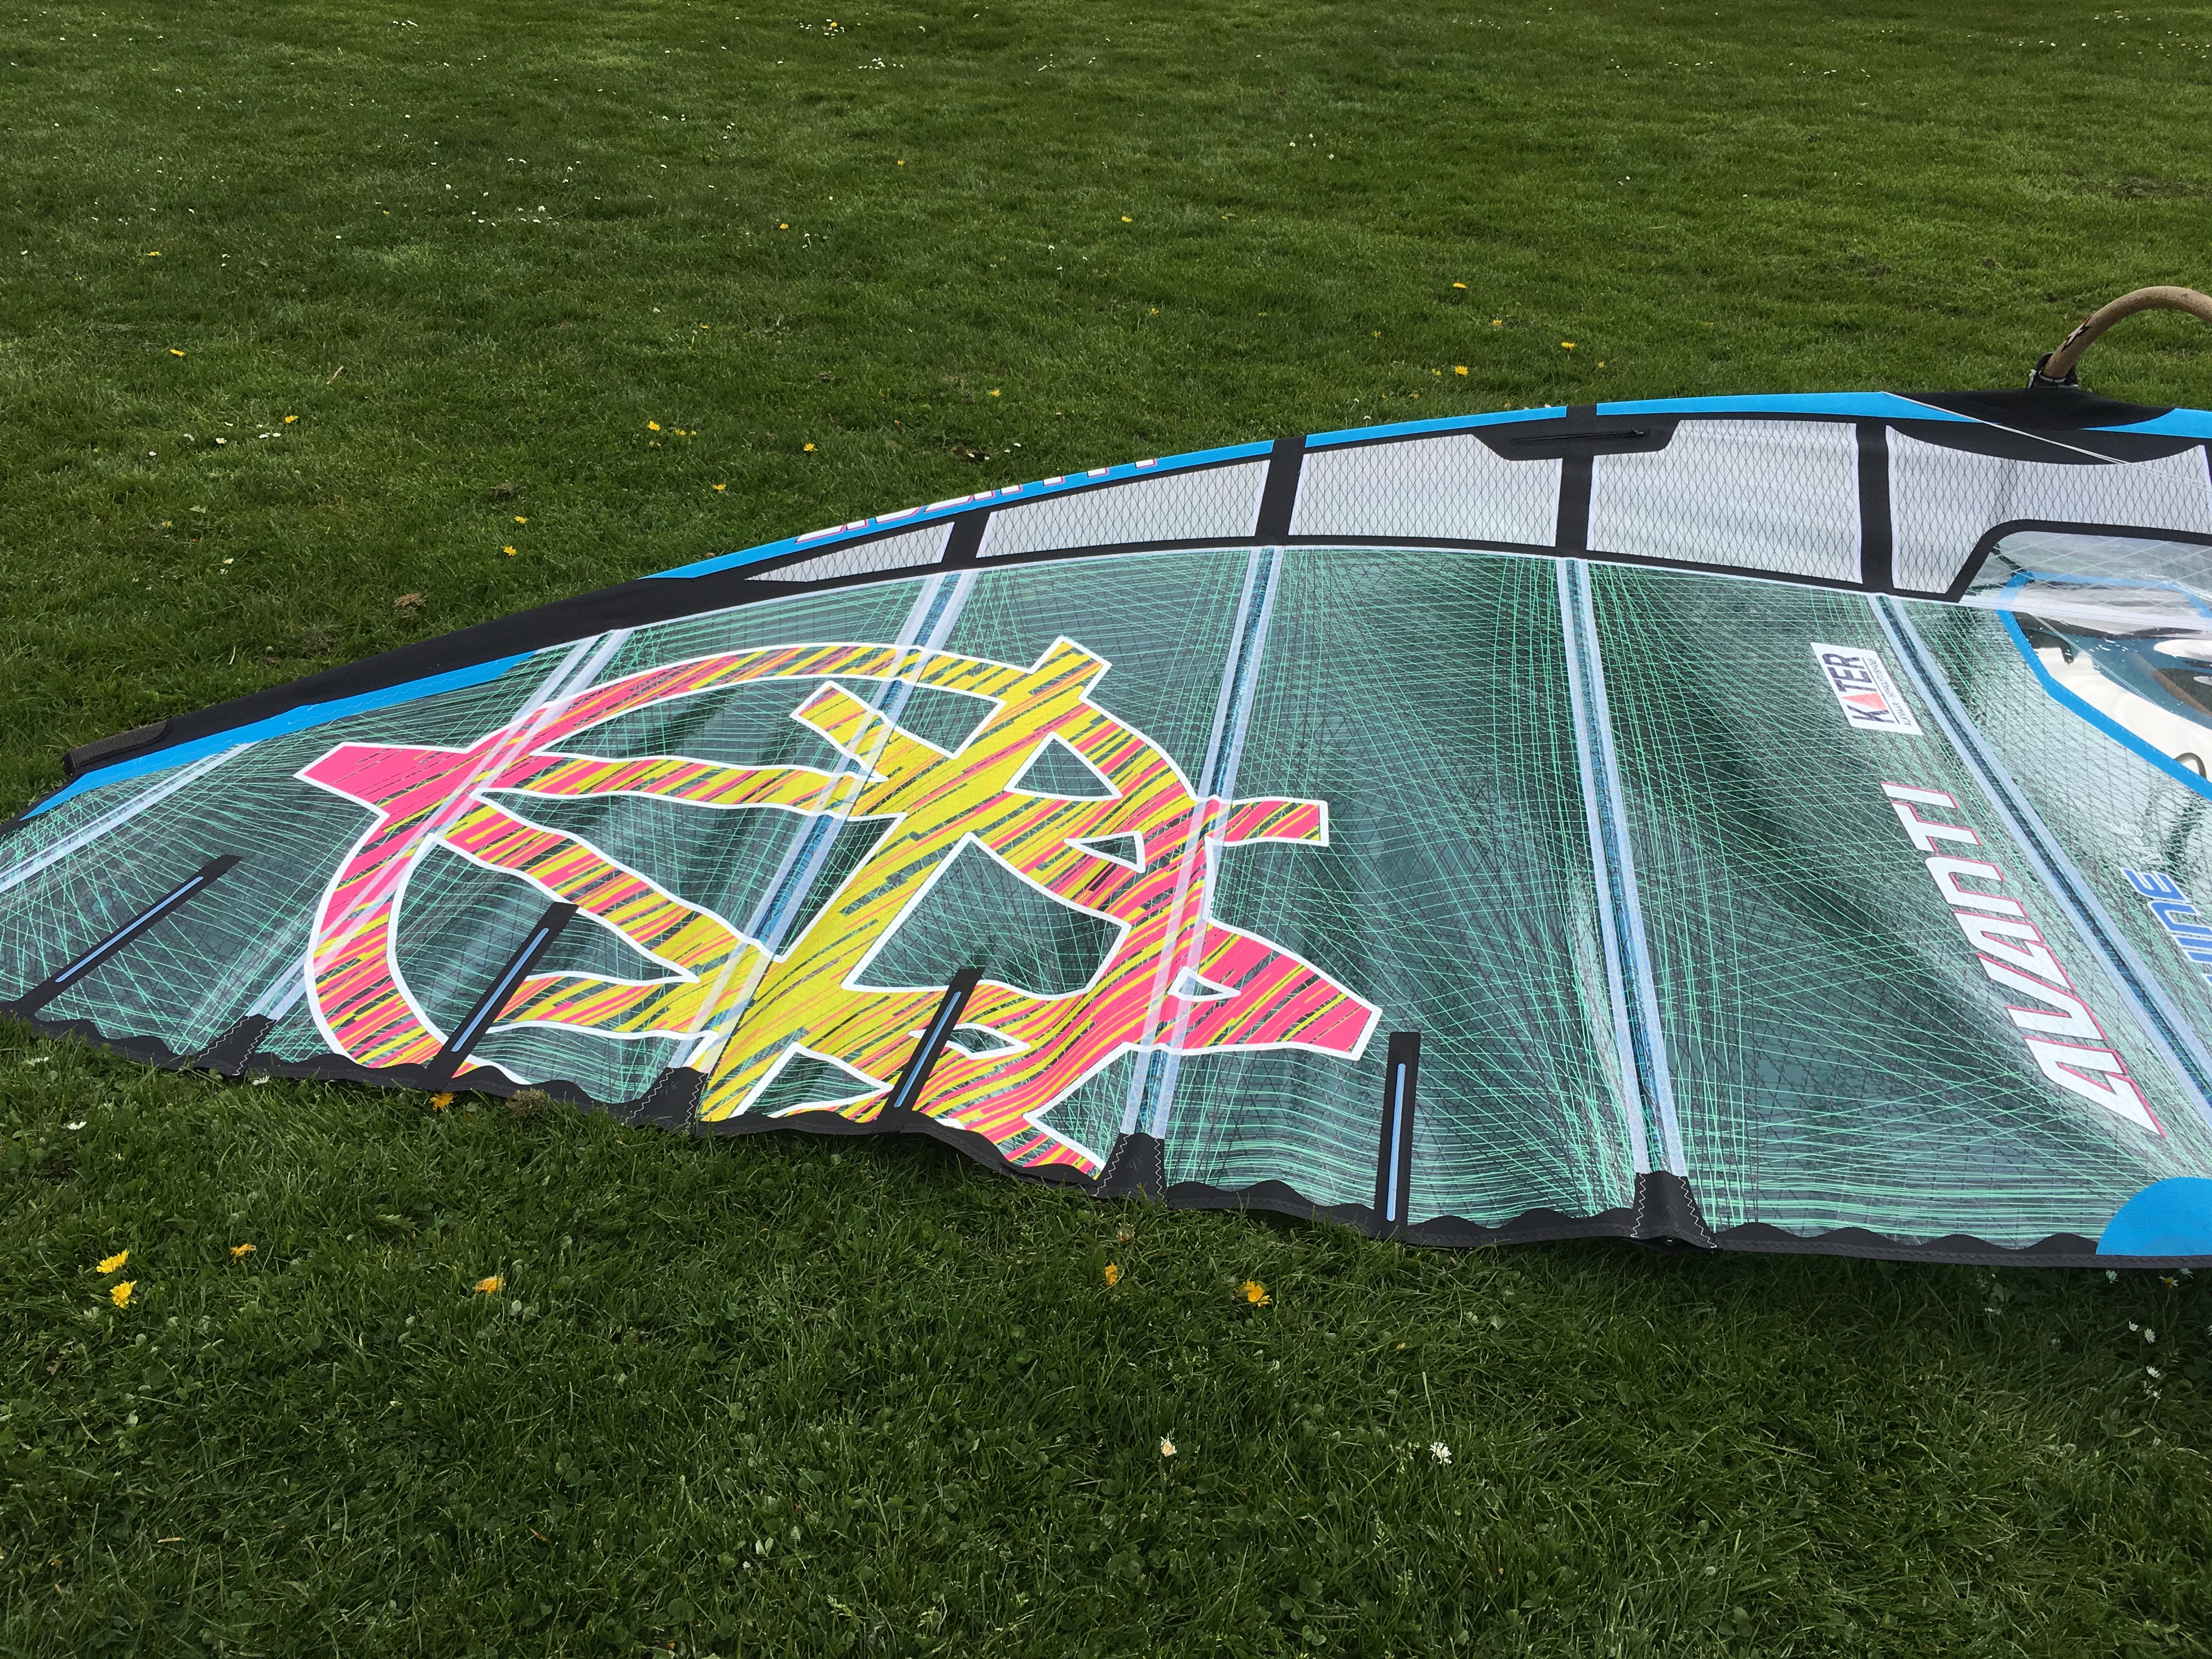 Small batten above batten 5 hits firmly the ground
- Camber pressure, rotation and spacers
Camber pressure has a strong relation with rotation and sail performance.
Camber pressure is mainly dependent on the height of the camber and mast diameter.
Batten tension has only a very low influence on cam pressure. Camber pressure can be varied over a wide range by adding or removing spacers. Stability of the sail will increase a little with increased cam pressure.
A relative low camber pressure gives a smooth breathing sail and at the same time easy rotation. Ideally suited for slalom type of sailing. For long distance sailing it could be helpful to increase the cam pressure a little bit.
The M5 has one spacer on each batten pocket when delivered (bottom camber will be delivered separately). However in view of above it is advisable to remove all spacers already before first time sailing. After break in (sailing around 5 times) camber pressure will lower a little bit.
Use the below “Click” method to determine if your camber pressure is still OK.
If excessive wrinkles are visible you could add spacers.
Even our top riders have removed initially all spacers to improve on softness and pumping ability (easy breathing is essential to enable this) and rotation.
To enable a more precise feeling and adjustment on cam pressure you could use
the so called “CLICK” method.
Start with the sail in reverse position. Use your hand palm to push the cam a little down wards. The force required to do so in combination with the sound when you take off your hand is a relative measure of cam pressure.
The louder the “click” sounds the higher the pressure. A damped sound relates to a lower cam pressure.
It takes some experience to work with this “click” method….but when that is build up, it takes only a minute per sail to perform this measurement.
The bottom cam should be relatively easy to “click”
The cam below the boom requires a firm pressure to “click”
The cam above the boom requires compatible or a little less pressure compared to the one below the boom
The top cam should have a very very low pressure. No “click” sound.
- Out haul trim – Grommet selection
The M5 requires a fair amount of out haul to explore the very high speed potential.
A good starting point will be around 20 mm extra out haul relative to the rest position of the clew. Give your boom a few cm extra length to enable this extra out haul and to prevent damage in the clew area.
Please be aware that the clew position is very dependent on the amount of down haul. More DH means simply a
longer required boom length. When your sail hits your boom over a distance of 10 to 50 cm the amount of out haul is probably correct.
The upper grommet gives a more direct feeling, more planning power and better up wind performance, moves your rig more upright (sail will not touch your straps) and put your board nose more down. A very suitable position for slalom type of sailing.
So far nearly all M5 riders are using the upper grommet position predominately.
In general the lower grommet shows a little more control, less power and fractional less up wind performance.
- Batten and tack strap tension
Pre – adjust batten tension before rigging starts. Tension all battens with the supplied Allen key till you feel a sudden increase in tension.
Normally all wrinkles have disappeared after this action.
Tension wise we use this sudden increase in tension as a “Tension” reference.
This reference tension is called : Low tension Fine tuning according to below scheme will be performed on a rigged sail.
Batten 8 is the bottom batten.
The below tension scheme uses remarks like “High” and “Normal” . All relative to
“Low tension”.
Normal tension – Rotate an extra 0,5 to 1 turn clock wise
High tension – Rotate an extra 1,5 to 2 turns clock wise
Batten 8 – Normal tension
7 – High tension
6 – Normal tension
5 – Normal tension
4 – Normal tension
3 – Low tension
2 – Low tension
1 – Low tension
It is advisable to re-adjust your batten tension after a few times sailing.
Adding some extra tension to batten 5 could improve up wind sailing performance a little bit.
Store the supplied Allen key inside the foot pocket of the sail to enable easy batten tuning on the beach.
Tack strap tension could be relative low to moderate. Already a lot of shape and tension is build into the lower part of the M5. Even a high tensioned tack strap will deform your sail and will have a negative effect on sail performance.
- Mast choice
It is good practice to start with the recommended type and length of masts (Rival).
These masts performing very well in the M5, especially with over powered
conditions, heavy riders and heavy chop.
For lighter riders it could be advantageous to use a shorter mast in the row. E.g
instead of a 490 for the 8,4 use a 460 + 30 cm extra extension. Or a 430 +30 for the
7,7. The Mast stiffness (IMCS) of the 460 increases by around one point when
extended by 30 cm. Hence from an IMCS figure of 25 for the 460 to 26 for the 460
+ 30 combo, compared to the 29 of the 490 mast. So the 460 + 30 mast is 3 points
softer. Certainly a good idea for lighter riders. Extending by 30 cm gives normally a
very little bit of extra flex top (+ 0,25 to 0,5 Bend Curve).
The older TowPro masts will perform full OK for flat water conditions.
- Board – Sail variables to free your set more easily
Apart from fine tuning your sail variables (down haul, out haul, camber pressure and batten tension) your board – sail combo will determine the total set performance. In cases it becomes difficult to “free” your board or it is difficult to rail or you experience a too low fin pressure.
Please try the following steps one by one:
– Mast position more back wards
– Boom in higher position
– Boom lines shorter
– Straps all the way back
– A little bit more out haul
– Add a little bit more down haul
– Rake your fin 1 or 2 degrees more
What could be of high value is to trim your combo for optimum upwind performance. When doing so, most of the times your combo will work also very good for slalom and speed use. Use the trim marker in panel 3 as a starting point!
Use a fixed reference point and steps of around 3 mm DH differences to find the sweet spot (increase DH till up wind performance slows down, decrease DH again etc.)
To increase speed / performance even more it is advisable also to change all other variables in small steps.
Lots of sailing pleasure. For feedback please use this Email address:
info@avantisails.nl